The girls closet has been an ongoing dilemma on how to finish it off. In the end we decided to tear it out completely and redesign it. So this post is the unplanned for additional project of creating the Knockturn Alley walk-in closet!
 |
| Remember this picture of the original closet? |
 |
| Tore out the dividing wall to make it one open area. Lincoln comes to play in the mess with Daddy. |
 |
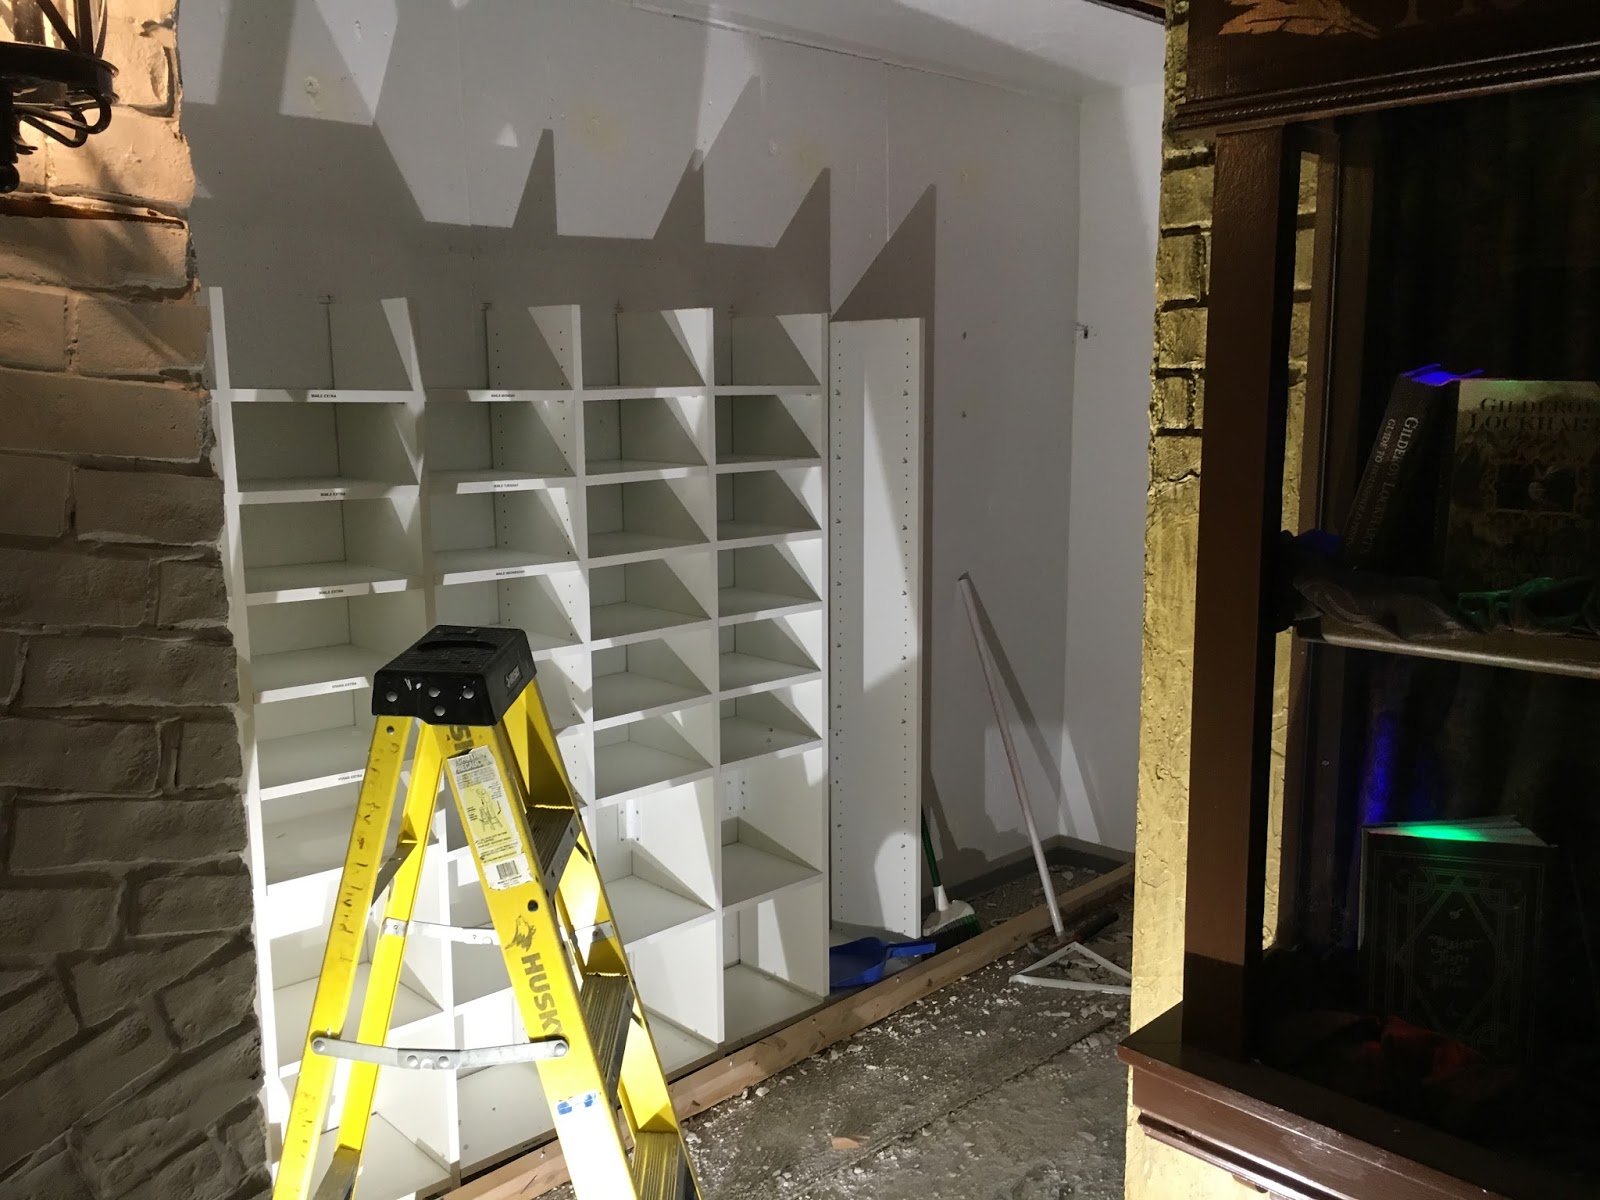
| Next, remove the shelving and old carpet. |
 |
| I start framing in the new wall and add an arched opening. |
 |
| Plywood and sheet rock starts to give form. |
 |
| Straight on view of the arched entrance. Next I will glue on the pink foam insulation. |
 |
| I draw out a random pattern of stones with a sharpie and begin playing with shaping techniques. |
 |
| I have a hot knife, heat gun, and torch to work with. I have never done this before but after playing with all 3 options for a while I get the hang of what they can do and begin shaping all of the stone. |
 |
| The front wall is complete to the arch. Being a corner basement bedroom, the ventilation is terrible. The acrid smell of melted foam became a visible cloud of toxic fumes so I stopped until I could buy a couple of fans to suck the nastiness out the window. |
 |
| With fans venting away the fumes I continue torching, cutting, and melting the foam. |
 |
| And after 3 days (evenings) I think I am ready to paint...... but everyone that comes in and looks at it says "NO! Leave it purple. It looks cool without being painted." So I opt to leave it that way. |
 |
| View from the closet side looking outward. The seams are very visible from this direction. My original plan was to calk the seams and paint it all. Now that I am leaving it unpainted I will have to try and hide the seams a different way. |
 |
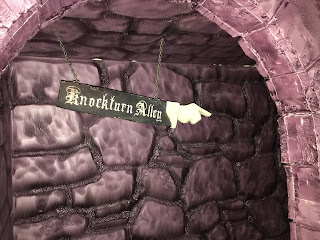
| The next part of the project was to create the Knockturn Alley sign that can be seen in the movie. Universal Studios made an accurate replica that I used as a reference photo. I measure the space I want the sign to fit in (24" seemed about right) Then I get proportions using rulers in photoshop, print the image on paper, and draw the outline onto a pine board. |
 |
| I used a jig saw to cut out the rough shape of the sign and a handheld grinder with a sanding wheel on it was used to do the rest. Then I added coats of white, red, tan, and black to the sign. I sanded down different areas of the sign to different paint colors to help bring out the aged look. |
 |
| I knew I wouldn't be able to freehand that detailed lettering accurately enough so I repeated the same process I used on the Flourish & Blotts sign for this one. Size and print the lettering, outline the back side of the lettering with a graphite pencil, apply transfer tape to the sign, rub an impression of the lettering onto the transfer tape, cut out the lettering, paint across the lettering, remove the transfer tape and ta-da! Ta-da makes it sound easy or magic in some way. It is actually quite a tedious process! A good book on Audible helped me forget about the time involved. |
 |
| I add a light wash over the lettering to help it looked aged like the rest of the sign. Here it is done. Time to hang it. |
 |
| I found some old chain in the shed to hang it in place. Thrilled with how well it turned out. now to kill the lights to give it that authentic spooky feel. |
 |
| I added a couple of LED lights to dimly highlight the sign. This picture does not do it justice. |
 |
| After staring at the stone for a while I decided the stone looked too clean. So I got out the spray bottles, mixed up a couple of mossy dirty looking colors and added a mossy dirty look to it. |
 |
| I dabbed areas I had sprayed with a rag to smudge and decrease the color intensity as my eye saw fit. With the shop lights off you can't see the effect very well, but I felt it needed it anyhow. |
 |
| So here is Knockturn Alley all done! |
We are continuing to add wand boxes to our collection (300+ wand boxes is a daunting task) and will soon be able to complete Olivanders. I have done all of the finish trim work, caulking, and sanding for both shops so Slug & Jigger's will be done soon too.
I have one other new feature I will be adding thanks to my Sister Briana. She came over from Kansas a few weeks back and said " you know what would be cool?" every time I hear that I think "oh, great, here comes more work for me..." But I listened to her paint her vision. "what if, instead of the door going into the bedroom you were to make the brick wall that moved apart to reveal Diagon Alley like in the movie!" I said "That would be cool. I couldn't easily make the bricks fold away, but I could change the entrance into one that is already folded open...... but wait, that A LOT more work!" But once she had put the idea in my head I couldn't get it out. So yeah, thanks allot Bree. One more new cool project coming my way. I think that one will be next since I can't paint that wall or do flooring until that project gets done.
Maile Eagar asked me on Facebook about showing a floor plan or layout of the space so I am adding it here for people who want to get an overhead view of what-is-where.
 |
| A lot is going on in this little space. Rough dimensions are 22' x 15' |